ccclarke
Seasoned Member
Nothing in life is guaranteed, but this simple fix may make someone's life a little easier, which allows me to pay it forward for all the tricks many of you have taught me over the years we've enjoyed all things XLR together on this forum.
Too many XLR repairs cost an arm and a leg; I think we can all agree on that.
Door pad switches tend to become intermittent over time, --especially the driver's side switch which receives the majority of use. In time, the switch can fail completely. They are exposed to not only wear and tear, but the weather, since they are not water-proof, -just water-resistant. Luckily, they're cheap and plentiful if you need a new one.
But what if you could fix your own door pads in less than thirty minutes with nothing more than 2 beers, two Phillip screwdrivers, and a 1 inch square of 600 grit sandpaper? Intrigued? I thought you might be. If so, here's how to do it:
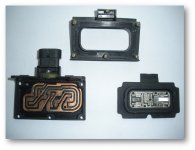
1) Using a #2 Phillips screwdriver, remove the two fasteners that hold the pad in place. Slowly pull it out of the door until you reach the connector. Unclip it and place the door pad next to the firt beer you're about to crack open. Hell, take a few chugs, here's where it gets fun. Feel free to continue draining that first beer as you perform the following steps. I've even included pics if you're drinking shots. -- Or whatever else takes you to your happy place. If you're a clutz or just plain spastic, tie a length of string around the connector in the door so it doesn't fall inside and ruin your experience with a fishing expedition. This is supposed to be fun!
2) Using a tiny Phillips screwdriver, remove the five fasteners that hold the thing together.
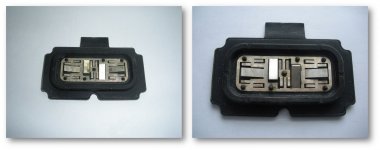
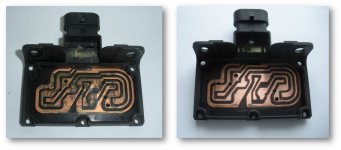
3) Gently open the housing and you'll see a rubber membrane that positions the switch contacts and a plate that has a bunch of copper traces that the contacts press against when the membrane is squeezed. They will probably look discolored and the traces oxidized.
4) Remove the switch contact plate from the membrane (it's got holes that align with tiny posts so the only way you can screw this up during reassembly is to force it onto the posts backwards and upside down. Don't do that or you aren't allowed to slam the celebratory beer afterwards, okay?
5) Using the sandpaper, lightly buff the switch contacts from where they join to the plate where they bend out. Not back and forth, but in one direction. Continue until they're nice and shiny. If they look like little snubs, you've burnished too much and you still don't get the celebratory beer. Or shot. Or whatever.
6) Attack the copper traces with the sandpaper until they're nice and shiny too. It doesn't have to be perfect, but pay attention to the (four) areas where the switch contacts will touch when it's put back together. To clean the copper even better after using the sandpaper, use a pencil eraser.
7) When you're done, reverse the disassembly process.
8) Test the switch to ensure it's operating before the next all-important step.
9) Finish that celebratory beer you've just earned.
10) Stare into one the side mirrors and marvel at your ingenuity and dealer independence. Yeah, you!
I hope this helps you at least enjoy a buzz while you test your newly-cleaned switch!
CC
Too many XLR repairs cost an arm and a leg; I think we can all agree on that.
Door pad switches tend to become intermittent over time, --especially the driver's side switch which receives the majority of use. In time, the switch can fail completely. They are exposed to not only wear and tear, but the weather, since they are not water-proof, -just water-resistant. Luckily, they're cheap and plentiful if you need a new one.
But what if you could fix your own door pads in less than thirty minutes with nothing more than 2 beers, two Phillip screwdrivers, and a 1 inch square of 600 grit sandpaper? Intrigued? I thought you might be. If so, here's how to do it:
1) Using a #2 Phillips screwdriver, remove the two fasteners that hold the pad in place. Slowly pull it out of the door until you reach the connector. Unclip it and place the door pad next to the firt beer you're about to crack open. Hell, take a few chugs, here's where it gets fun. Feel free to continue draining that first beer as you perform the following steps. I've even included pics if you're drinking shots. -- Or whatever else takes you to your happy place. If you're a clutz or just plain spastic, tie a length of string around the connector in the door so it doesn't fall inside and ruin your experience with a fishing expedition. This is supposed to be fun!
2) Using a tiny Phillips screwdriver, remove the five fasteners that hold the thing together.
3) Gently open the housing and you'll see a rubber membrane that positions the switch contacts and a plate that has a bunch of copper traces that the contacts press against when the membrane is squeezed. They will probably look discolored and the traces oxidized.
4) Remove the switch contact plate from the membrane (it's got holes that align with tiny posts so the only way you can screw this up during reassembly is to force it onto the posts backwards and upside down. Don't do that or you aren't allowed to slam the celebratory beer afterwards, okay?
5) Using the sandpaper, lightly buff the switch contacts from where they join to the plate where they bend out. Not back and forth, but in one direction. Continue until they're nice and shiny. If they look like little snubs, you've burnished too much and you still don't get the celebratory beer. Or shot. Or whatever.
6) Attack the copper traces with the sandpaper until they're nice and shiny too. It doesn't have to be perfect, but pay attention to the (four) areas where the switch contacts will touch when it's put back together. To clean the copper even better after using the sandpaper, use a pencil eraser.
7) When you're done, reverse the disassembly process.
8) Test the switch to ensure it's operating before the next all-important step.
9) Finish that celebratory beer you've just earned.
10) Stare into one the side mirrors and marvel at your ingenuity and dealer independence. Yeah, you!
I hope this helps you at least enjoy a buzz while you test your newly-cleaned switch!
CC
Attachments
Last edited: