Welcome to the Cadillac XLR Forums!

VVT solenoid actuator oil leak UPDATE

justdennis

Seasoned Member
Joined
Jan 12, 2022
Messages
209
Location
Florida
My XLR/V(s)
2007 Black XLR-V
I noticed oil leaking from around the solenoid actuators, after close inspection I determined it was coming from where the wire plugs into the magnet. All four connectors were soaked in oil so I'm surprised the car ran fine with no check engine lights. Found new AC Delco replacements at rock auto. Installing the new ones were easy, I just inserted two studs, slid the new solenoid on, then ran in the first bolt as instructed in a previous post. No leaks and the car is still running great so I guess the job is complete. Admittedly I don't know much about VVT so if anyone knows if I need to do anything else, please let me know. Thanks
 
You are good to go. I like to install the center pin locator so you know they are dead center. Without it they can touch which wears and makes noise but ive need seen a failure from it.
 
Thanks for the reply, I have no experience with VVT so I wasn't sure. I was trying to figure out what the magnet did to change the operation of the valves but I've decided there are some things I just don't need to know. No leaks and it's running good, I'm a happy guy.
 
Its pretty simple. the valve has a center tube that the voltage to the magnet when changed moves in and out of the valve. The holes in the tube allow the pressure to change and advance the gear on the camshaft. That allows for a nice balance between economy and performance. The performance guys eliminate it and lock the cam gears in the most advancevthey can tor max power at all times. Fuel milage and low end power suffers . glad you got that messy oil leak cleaned up as it only gets worse over time
 
UPDATE
After replacing the solenoid actuators I have noticed a dramatic increase in low end power. I don't race the car but I do like to get on it once in a while if I'm on an empty country road. Since I changed the actuators it overpowers the traction control and gets exciting real quick. In the past it would break the tires loose but nothing like it does now. The only other difference is I put a can of injector cleaner in the last tank of gas but I wouldn't think that would make that much difference. Last year I had it dyno tuned and we made a few changes at that time, it did improve the performance, but again nothing like it's running now. If the actuators made that much of a difference why were there no check engine lights or codes. I have no idea if the top end is any different, it may not have affected that at all. So if you have noticed a decrease in low end power this may be something to look at.
 
Yes I believe so, check Rock auto the price may be different but there are choices that are cheaper.
 
just made the same discovery on my 06 LC3. Have a set of 12567085 on the way. Is there a good link for what I need to know for replacing these? One plug plus three fasteners for each, it can’t be that easy. Any gasket or RTV I need to use? What’s the center pin locator referenced above?
 

Attachments

  • IMG_0885.jpeg
    IMG_0885.jpeg
    2 MB · Views: 17
Loosen the bolts but leave them in when you try to break it loose from the head. Gm used some really strong stuff. If you pry it loose without the bolts in you can break the vvt valve. It will snap right off. Now if you want to do it correctly .get you some long bolts the same size as the little screws. Just an inch or so long but long enough that its not threaded all the way . a stud is perfect but harder to find. Cut off the head . Hand screw the three headless bolt into the head . Slip the part over the bolts that are acting as alignment pins. When pushed against the head so you can hold it.remove one stud and insert one bolt. Then the next one . one at a time. That will keep the magnet centered. you can do it without the studs but you may get noise from the vvt rubbing and you can get premature wear on the magnets. They run on oil and should not touch. Its a very close installation that you can get wrong. I use high temp oil resistant sealer. Not much is needed.
 
Two possibly dumb questions.

1 - during removal I bumped the VVT actuator by a 1/4 turn or so. Do those care about rotation or is it just a push/pull action? As in, have I royally made matters worse?

2 - the reside left over, does that need to be removed or, provided I have an unbroken ring for which my RTV (ultra black?) to seal, is that workable?
 

Attachments

  • IMG_0904.jpeg
    IMG_0904.jpeg
    374 KB · Views: 9
If you are talking about the cup in the center. It spins .you can carefully pull it out and make sure it snaps back in.You also only have 1/2 the accuator removed. Put the screws back in and peel off that last cover. They you will need to clean the head very good before putting on sealant.
 
No worries about the rotation but I would make sure to have a clean surface before reassemble.
 
Thank you gentleman. Can confirm I got both halves of the magnet casing off (first one split during removal, although on my second one I got it off in one piece). Used a plastic scraper to take that white adhesive/sealant off the mating surface and took it down to bare metal, and used brake clean on the metal mating surfaces. Will do other side tomorrow, time for whiskey!
 
Knocked out the other two this morning. Summarizing the experience since I came across some confusing info out there. 12567085 was the PN for my 06 for the replacement magnets.

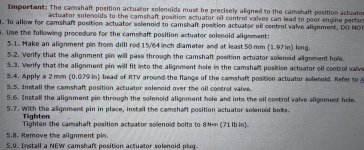
Official procedure (attached photo) is to take out the black center cap on the magnet and use a 15/64" dowel rod in there as the centering device. However, removal of those center caps destroys them and I can't even find a part number [edit: PN is 12567421 and it's discontinued & unavailable], nor a listing for them. So I didn't want to remove those caps and use the centering pin. On to Plan B, the three studs method.

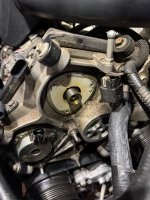
I used Hillman 880660, cut the heads off, and wrapped two layers of vinyl tape around the upper two thirds of them (so it was a tight fit passing them through the bolt holes on the magnets). To remove the old magnets, I backed out each of the fasteners until I could see about 1mm of exposed thread, then used a sharpened chisel to break the seal. Once the magnet was free for that 1mm of play, removed the fasteners one at a time, replacing them with the studs. Remove old magnet, use sharpened plastic chisel to remove the adhesive/sealant down to bare metal, vacuum out the bits of debris, use extreme care not to get any in the center opening or on the VVT actuator itself. Cleaned mating surfaces of new magnet and on the engine with brake clean and lint free rag. 2mm bead of black rtv on the new magnet. Install (using the studs to align it properly). One at a time, remove studs and replace with fasteners, hand tightened. Wait one hour, torque to 8Nm.

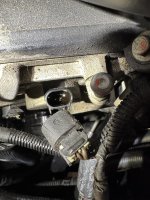
Since my connectors were oily, I used QD electronic parts cleaner and cleaned them out as best I could, let them dry, reassembled. In my case, doing this job with the PS reservoir removed, as well as the alternator/water pump belt & tensioner removed, gave me plenty of clearance to work.
 

Attachments

  • VVTMagnets.jpeg
    VVTMagnets.jpeg
    247.5 KB · Views: 6
Last edited:
Sounds good. Yeah the removal of the center cap was ok when you could get delco parts as the cap could be removed and a little sealer put on it to replace. i believe based on what you said you should be good to go.
 

Cadillac XLR Forums

Not a member?  Join now!  It's Free!

Learn more about Supporting Membership

Win 2 Supercharged Cadillacs!

Win both supercharged Cadillac Vs!

Supporting Vendors

Top Hydraulics

Cadillac XLR Registry

Click here to enter the official Cadillac XLR and XLR-V Registry
Back
Top Bottom